(collated from posts at Topfield Australia's forum by Grunta)
(from Leigh Hocking and others posts, their experiences and mine, blogged to preserve the collective experiences)
22/03/08
There have now been lots of posts on the forum relating to problems with various Topfield 5000 models, that have been traced back to power supply problems, at the bottom of this Blog is info on the layout and capacitors that should be replaced,
Anyone taking the top off a Toppy would be well advised to check the voltages,
there have been lots found to be out of spec .... 5V should be no less than about 4.75 V and 12V shouldn't be more than 12.3V, - if they are out- it can lead to a fried hard drive or motherboard or front display
Regardless if you are replacing the hard drive with a larger model or just putting the original into a caddy, you should check them
(click on images to see bigger versions)
- FIRST THINGS FIRST.....
- purchase a new Harddrive, (PATA or IDE - same thing) as of April 2007 users have installed 500 gig drives
- it must have a power consumption close to the original
- Seagate ST380012ACE) +5V 0.72A +12V 0.35A (see circuit drawing at the bottom)
- Now Sata drives can be used (See instructions lower down under Sata Drives)
 Step 1.
Turn the unit into standby mode and unplug the power from the wall so you don't get zapped --
there are exposed hi voltage capacitors,

 Step 2.
Remove the 5 screws on the case. At this stage decide to setup a caddy system or just replace the Drive
(actually before this stage ... you need to buy the parts LOL)
see link below for caddy system
Step 3.
Once inside the case unplug the standard hard drive power cable and data cable from the drive.
Step 4.
I found it necessary to remove the entire Hard Drive bracket another 4 screws so that I could get to the 6 screws firmly holding the Hard Drive still in the bracket. - the layout differs slightly (more room) in the later full size case models
Step 5.
If you'd like to copy your existing shows over to the new hard disk then first you need to temporarily plugin the new hard drive into the Topfield so that it will be formatted with the Topfield file system. For some reason this is better than using TopfHDRW to format it
Next tip is to check that the hard drive jumpers are configured to Master / Primary for the new drive and then just sit the hard drive back in the bracket and place the bracket back inside the unit. Reconnect the hard drive data cable and power plug. You'll also need to reconnect the video cable so you are able to see the output of the unit. Next plug it back into power and turn the unit on,
keep away from the inside of the unit with live power and exposed wires.
Step 6.
As soon as the Topfield starts up it automatically asked me "do you want to format the hard drive" (Yes/No) and that formatting would erase all existing data on the disk.
If you unit does not prompt you automatically using your remote bring up the menu and under installation select the option Format Hard Disk, once again answering yes I'm sure. This will only take a short moment and will respond with format complete.
At this stage you have completed the hardware upgrade but what about all the shows.
Step 7.
Set the unit into standby mode and unplug the power from the wall again. Also once again remove the power and data cable from the new hard drive allowing you to remove the disk from the unit.
Step 8.
Now with 2 hard drives in hand go to your PC and download the program TopfHDRW from Tapworld and install it onto your PC or an external USB setup (this can be an external enclosure or an IDE -> USB converter). Next set the jumpers on both hard drives so that one is Master and one is slave (as needed for your system) doesn't matter as long as your config allows for both hard drives to work in your existing PC.
Step 9.
Power off your PC and install both drives into the PC and reboot being very careful that if and when your windows operating system politely tells you that it has discovered 2 new drives and would you like me to write signatures on them that you select the NO or cancel option as this CAN trash whatever data is on the disc (yes that means your precious shows) gone for ever!
Step 10.
Logon to Windows as Administrator or equivalent (required for TopfHDR to work). To enable Windows to access these Topfield formatted drives correctly we now start up the program TopfHDRW and select Topfield drive 0 as the original drive on the left side of the screen. From the menu Enable write mode then on the right hand side select from the list Drive 2 the new larger Topfield drive.
You should then be able to browse and select/ highlight the shows and program files that you would like to copy across to the new drive.
This can take some time depending on the amount of data but for me with 120GB it took around 4 hours.
While you wait you might also like to download HDDInfoTap from Tapworld and extract the file from the zip file and also copy it across to the Programs folder on the new Topfield drive for use later on in setting the drives acoustic. Alternatively you can download a program called featuretool_v195.exe and this allows you to create a boot floppy and configure the drives settings while it is plugged into your PC. If your asking for my opinion I think it is much simpler to use the HDDInfoTap plus you can make changes to the drive at a later stage while it is still in the PVR.
Step 11.
Once your happy your data is copied over to the new drive, shutdown your PC and remove the new larger hard drive.
Step 12.
Change the jumpers back to Master / Primary on the new hard drive again.
(I have found Cable select works ok also, which makes it easier if you go down the caddy route)
Step 13.
Firmly screw the hard disk back into the Topfield bracket and then attach the bracket to the case, before reattaching the power and data cables to the upgraded drive.
Step 14.
Put the Topfield case lid back on and replace the "warranty void if removed" sticker
with an "Upgraded Toppy" one
Step 15.
Reconnect all the AV cables / Antennae and then Power the unit back on.
Step 16.
You should now be able to browse your precious collection of shows and mp3 and programs, but this time hopefully with a lot more free space.
Step 17.
Since the serial number of your hard drive has now changed many of the purchased programs that you have licensed may no longer work Eg ProgressBarKeys and Improbox for example. So you might need to be nice to the authors of these programs and send off an email requesting a re-license key for their TAPS owing to the harddisk upgrade please.
special thanks must go out to Alex / FireBird the author of the HDDInfo and TopfHDRW for without these valuable tools the pain level and time in copying alone would definitely be increased.
Sata drives
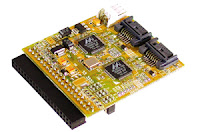 It is now possible to use Sata drives with an Ide - Sata convertor, But you need to get the right type (host),
and chipset, it appears the Sunix SABR2000H model with the marvell chip is ok
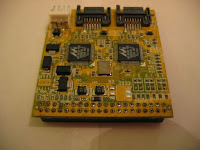
and either a cable needs to be added or the ide connector repositioned to reduce the height as has been done by gazza (Topfield Australia forum)

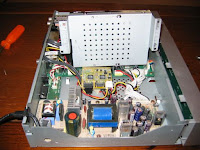
the jumpers were permanently set as seen in the picture
..and fitted inside the Toppy
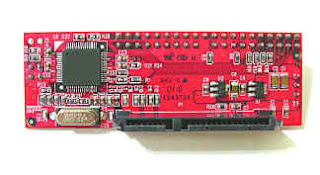
another option .... needs to be a Marvel chipset
Sata converter link

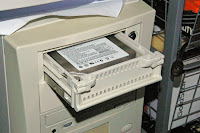 Caddy system
Original testing and set-up by Fossil,(our first Toppy Freak)
who found out through a lot of trial and error the solution to a lot of problems
If you want the fastest transfer you will need 1 of these options
- external USB enclosure,
- NEW hard drive caddy in your pc,,
- -- or open the pc and connect directly
- needs to have 80 wire 40 pin connector (ata 133) ...for all 3 options
If you go this route, make sure you have the correct jumper setting for the HD to match the cable connection of the pc ie: slave or master and return to master when you put it back in the toppy
- that said - I've found setting it to CS (cable select) is best, so there are no conflicts with pc and the toppy doesn't mind it being left that way
- 1 for toppy and
- 1 in your pc, (needs to have 80 wire ata 133)

An external USB or firewire enclosure has the advantage of being hot swappable,
The toppy has to be in standby before removal of the caddy
..... maybe stay away from Laser brand, some people have had trouble
Use a quality 80 wire cable (normal 40 pin connector)
don't buy cheap ones..... the new round 80 wire ones work fine .... if you use a long cable you my find a very SLIGHT delay when using the remote and file list coming onscreen,
Connect blue/coloured end to the HD and other end to the motherboard, this is opposite to what you would do in a PC
 --> (you may have to drill/pick out a blanked out pin hole in the connectors - as there are only 39 holes on most cables) and use the end connection, not the middle one..
PC power extension cable
brackets to firmly mount caddy

If you want everything tidy, pull the toppy apart and remove the back panel, this requires undoing the motherboard and all the screws at the rear,then unclipping the back panel, and cut out a little bit of the case to make way for cables, ..I've used a cable protector from an old power supply, its been found to work ok without the need for ferrite chokes
If you get a bigger HD - its just a matter of screwing it in and formating with the toppy
BUT be aware there are a number of people who have had problems furhter down the track,
and this has been put down to power consumtion (too high)..... original (+5v 0.72A, +12v 0.35A seagate80)
-- also if in a cabinet or with /on top of other AV equipment, heat build up can be a problem, people have found raising the unit will pc rubber feet etc or adding a fan to the cabinet helps, if using a caddy I don't believe its needed, I've left the caddy lid off, and removed the shitty fan that came with the caddy - too noisy
To read the Hard drive in the PC, bios will see the drive ,
but it uses a Unix type file system so windows doesn't see it
you need --
( valid for Windows pc, alternatives are available for Macs, unsure of status for Linux)
- TFtool or
- TopfHDRW, my preference is TopfHDRW both program have utility tools to fix most problems, thay can both be found at Tapworld
- Ntfs formated hard drive in your computer to transfer files as fat32 has a file size limit below 4 gig ( I will find the correct value an repost)
If you have 0 time file, but ##.gig file length there is a tap that can fix most (## being numbers)
Power Supply
circuit drawing (thanks Dave®) and current info on repairing power supply
power supply info and pictures from Dave® @ Toppytools
Standard contr ols on the 5000pvrt remote
(Courtesy of leighhocking, and others that have posted on Topfield Australia forum)
(edited and added to, from posts taken from the forum and self experiences by Grunta)
